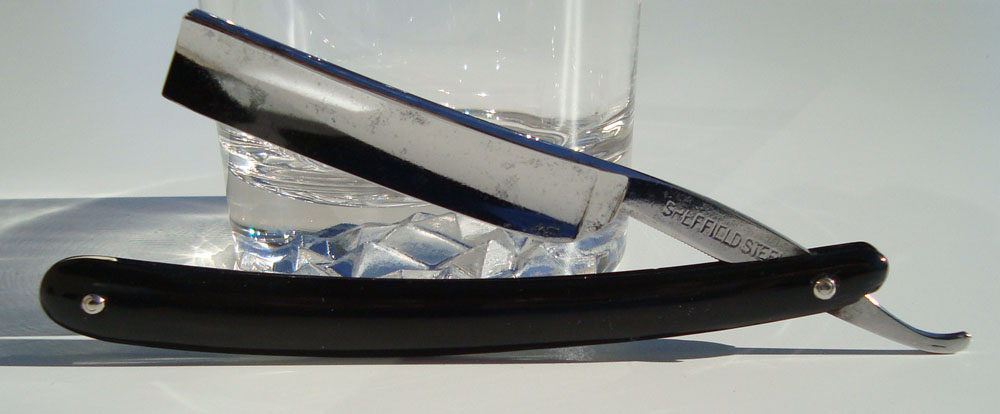
5/8″ Sheffield Steel Featuring Hollow Grind, Smile, & Horn Scales

This razor is stamped with only the words “Sheffield Steel.” Based off of the grind, it is highly likely that this razor was ground in Germany of steel made in Sheffield (the world’s steel center of the time). Sheffield silver steel is prized for its sheen and edge holding abilities.

This razor features a hollow ground with an aggressive looking square point and a slight curve to the blade. The tang features bottom jimps. The scales are made from black horn restored to their original luster and shine.

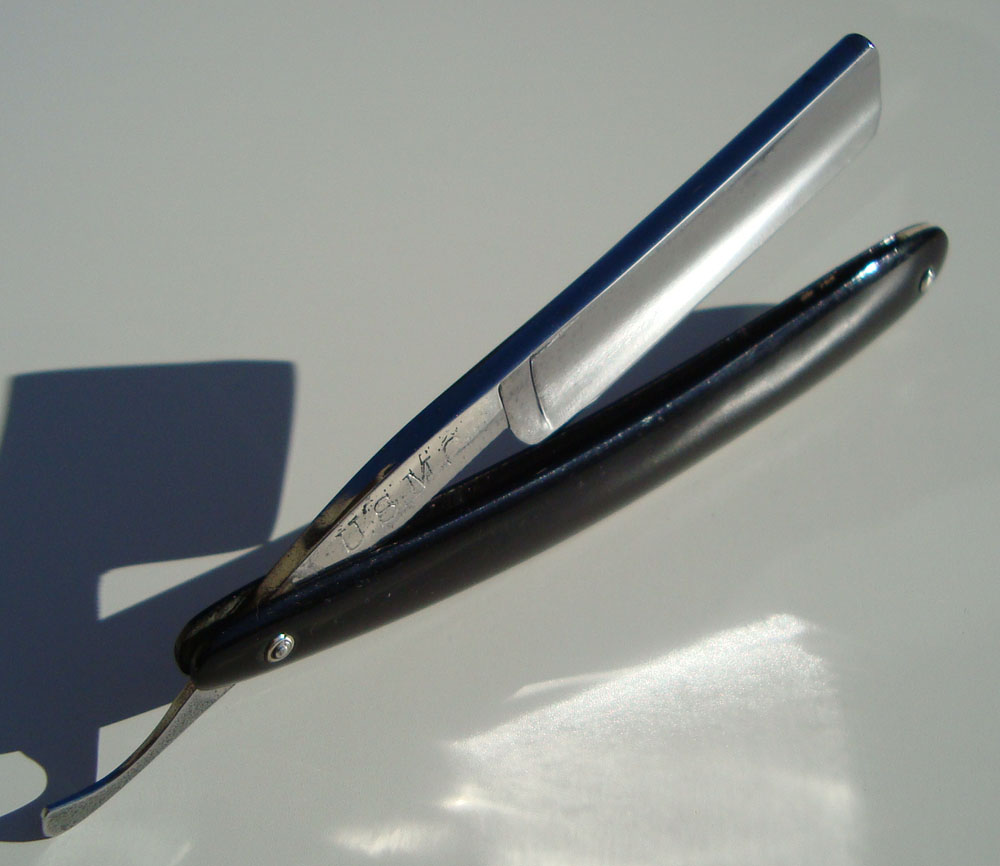
6/8″ U.S.M.C. Clauss Standard Issue

This razor is the highly sought after US Marine Corps straight razor made by Clauss right here in the US in Fremont, Ohio. These razors were issued during the WWI era. This razor features a plain face measuring just over 6/8″ with a round point for safety. Stamped on the tang is the Clauss brand and the words “U.S.M.C.”. The scales are original black horn polished to a high lustre to bring them back to life.

Double Duck Goldedge

This DD was tarnished and needed some cleaning to bring it back to its former vibrancy and life. So, we went ahead and did just that.

Things to consider before buying a hone

For many people, the thought of purchasing a sharpening stone along with their straight razor is second nature. For some, this is exactly what they want. For many others, it is a terrible decision. This article will explore why you should, and why you shouldn’t, buy a sharpening stone for your straight razor and start sharpening your own straight razors.

First things first. You don’t need a sharpening stone. With the rise of globalization, you can send your razor out to be professionally sharpened. This honemeister (master of hones) will do an incredible job and ensure your razor is beyond shave ready. Secondly, hones are expensive and require a massive amount of time to learn proper sharpening technique. As such, the only real reason you should even purchase a stone is to become self sufficient.

Do You Really Need One?

Unless you live in 19th century America on a ranch far from civilization, you do not need a hone. Even in the 1800’s men who could afford their own razor would take their razor(s) to the local barber for sharpening.

“There are hidden costs associated with sharpening stone ownership. In addition to the stone, you need to purchase a $110 lapping plate. If you want to do more than touch up your razor, you need more stones. A lot more stones.”

With the decline of the straight razor and the rise of the DE razor and now the modern multi-blade cartridge razor came the decline of the local barber and the art of straight razor sharpening. No longer can you simply walk down the street and have your barber sharpen your straight razor.

In today’s world, the mail in honemeister has taken over for the extinct local barber. Today it is now easier than ever to have your razor sharpened. Not to mention consistently better quality and lower cost.

The Best Reason You Should Buy One

Let’s face it, sharpening a straight razor is not a walk in the park. In fact, I wouldn’t even call it easy. I’d call it simple, but so is drilling out a cavity. As this article will discuss, the perceived benefits of purchasing your own hone simply does not pan out. The only real reason anyone should be purchasing a sharpening stone is if they want to be completely self reliant (or if you start restoring a ton of old razors).

The benefits of self sufficiency are self explanatory. If you don’t care about self-sufficiency, clearly honing your own razors is not for you. And while being self sufficient is vastly inefficient, it is its own reward. It is good per se for the man who wants to fend for himself. It is the only way to live for this man. There is simply no other option. The cost does not matter. To this man, I say, go forth and buy hones! Just try not to contract Hone Addiction Disorder and purchase an entire closet full of stones you may or may not use. Trust me, the person your living with won’t appreciate it too much.

“Sharpening a straight razor takes time and money, but it is not impossible. You can become self reliant.”

Self sufficiency is exactly why you should buy a hone. It is the only reason that adds up in terms of dollars and cents. You can learn to sharpen your own razor and you can purchase the necessary equipment for less than a high end computer. It’s not prohibitively expensive. So, if self sufficiency is your only goal in life, then read no more. Buy those hones and start learning!

Norton 4000/8000 Grit Waterstone


Is Buying a Sharpening Stone Cheaper?

Many people think that purchasing a hone is cheaper. This assumption ignores even cheaper alternatives (read on to find out what they are) that provide the same or better results. It also ignores the time value of money, the value of your time, and the time required to recoup your investment. In the extremely long term, say 30-50 years, buying a stone and sharpening your own razors would be cheaper, but is a lifetime investment. Who knows what we’ll be shaving with 20 years from now; lasers? The truth is that buying a hone and learning to hone are extremely costly, both in terms of time and money.

“Not taking into account the ~10-20 hours of your time, at $16 per re-honing and accounting for the cost of lapping tools, the investment recovery time is 5-9 years.”

Let’s examine the most famous sharpening stone, the Norton 4k/8k. This stone will set you back $80. A better alternative is the Naniwa 12,000, which will set you back the same amount. A straight razor needs to be sharpened between 6 months to 12 months, depending on how well and often you strop the razor. If you strop like a fiend (200+ laps per day) you can push it to 1.5 to 2 years.

You can get your razor sharpened for $20. Shipping two ways is $6-$10. At $30/sharpening you will recoup your costs within 1.5-3 years. However, if you’re paying $20 to re-hone your razor, you are paying too much. You can get your razor re-honed for $10 if your razor was previously sharpened by the same vendor. And let’s face it, you shouldn’t be initially sharpening your own razor without a lot of experience behind you. At $16 per sharpening, the investment recovery time is 3-5 years. At $20 for priority mail, 2-4 years.

The Hidden Costs

In addition to a hone, you need either: a lapping plate or a lapping surface + wet/dry sandpaper. A good lapping plate is between $120-$320. A lapping surface can be anything with a .0001″ flatness. You can purchase granite plates advertised as such for around $30-$70 depending on size.

“Adding up the costs for honemeister quality stones, the time to recoup your initial investment is going to take an entire lifetime.”

While a 12k Naniwa will put a fine edge on your razor, true honemeisters don’t stop there. The best use expensive and rare natural stones or similarly expensive synthetic stones. A Shapton 30k (the finest synthetic stone money can currently buy) costs $310. An Escher will run you anywhere from $120-$300. A Japanese stone can cost thousands of dollars for just one stone. Not all hope is lost, some people are perfectly fine with the edge off a 12k Naniwa.

Additional Stones are Needed for Additional Tasks

For any task other than touching up an already sharp edge, a 12k is not going to cut it, and you don’t want to shave off an 8k if you can help it. Thus, you’re going to need more stones. And they all need lapping too.

Doesn’t Owning Multiple Razors Cut Down the Cost?

Owning multiple razors does not make the hone pay itself back any faster. Your razor does not dull perceptibly if you don’t use it. If you own two razors, each razor only needs to be honed half as often. Three razors, a third as often; and so on. Owning multiple razors costs the same total amount, even though maintaining each individual razor costs less.

What is Your Time Worth to You?

Time is our most precious resource. Learning to properly sharpen a straight razor is a matter of dozens or hundreds of hours. It is possible you already possess some of the requisite skills, but in most cases, dozens of hours is typical to achieve a workable edge. To even come close to the skill level of a honemeister will take you hundreds of hours and razors.

“Not only does the honing take a lot of time, but so does the lapping.”

What you can’t learn without thousands of razors and countless hours under your belt is how to handle problem razors. Honing is simple if your razor has a perfectly straight edge. All you really need to do is to hold the razor steady and push. Yet, for smiling razors, razors that need edge repair, or anything other than a perfectly flat edge, they require a special set of skills mastered only after putting in the necessary time and effort.

Whatever you value your time at, you have to spend time learning to properly hone a razor. If you don’t, bad things can happen. Check out these honing mistakes.

The Practically Free Alternative

As I promised you at the beginning of the article, I’m now going to share the cheaper alternative with you. The not so secret “secret” is chromium oxide pastes and diamond sprays. While it doesn’t quite replace a hone, it will extend the time between sharpenings for extremely long periods, measured in years. Not only that, but you already possess the necessary skill: stropping.

If you are a responsible straight razor owner, you already own a strop. And you already know how to use it. All you have to do is purchase some chromium oxide paste/powder or diamond spray and, if you don’t already have one, a cotton/linen/felt strop (leather works too but is sub-par). If you already own a cotton or linen strop, you can use the back side and flip it over for regular stropping. To learn more check out our guide on pastes & sprays.

Conclusion

In conclusion, the only good reason for buying your own hones and sharpening your own razors is if you want to be self sufficient. Another reason is if you want to start restoring more than a few straight razors per year. The perceived benefits just do not pan out. Especially when you have such a cheap and ready alternative in pastes and sprays.

ASR’s Ultimate Illustrated Guide to Stropping

Words cannot express how important stropping is. Read on to find out exactly what stropping does and why you should do it.

This article’s aim is to educate you on how to properly strop your razor. From how to grip the strop, to how to perform each stroke. We will show you the right way to strop your razor and the correct number of laps you need to do in order to keep your razor in tip top shape.

Attaching the Strop

When your stropping, you need to do two things: control the tautness of the leather and control the razor. In order to pull the strop taut, you either need a paddle strop (in which case you can skip ahead) or you need to attach the non-handle end to something. I personally prefer my doorknob attached with a piece of leather thong. As you can see from the pictures, a simple loop made with a square knot easily attaches to a metal rod.


In the picture on the left, you can see a very basic strop with just a hole in the top attached using a very long loop of leather. This is by far the simplest method of attachment. To the right is how I attach my personal strops. They all have hooks so I use the same principle as show to the left, but hook onto the end of the loop. I don’t use the included metal circle and prefer this method because the flexibility of the leather thong really helps to keep the strop flat.

Holding the Strop

The oldest style of strop is just a square cut at the bottom. Also known as barber’s style. Don’t know why. There is really only one way to hold this type of strop. Using your thumb and forefinger you pinch the bottom and pull. Pictured to the right of the square cut bottom is a D-Ring. A D-Ring is just that a metal ring in the shape of a D. It is attached to the strop on the straight end and you hold the round end. You hold it as pictured with more or less fingers as desired.


As strops evolved, the D-Ring (pictured above) and strop handles evolved (pictured below). A strop with a handle can be held either by the handle or in the same manner as a barber’s strop. If you own a Tony Miller strop or a clone, your strop will have a square ring with a leather handle. This type of strop presents infinite ways to keep the strop taut. Take a look!


By far the most popular way to grip the strop is by the handle. It is the easiest and most intuitive way to pull the strop taut. That said, I actually prefer some of the other methods shown. I find they are a little easier to hold and keep the strop taut.

You’ll notice in the pictures that the strop is being held waist high and pulled to near the middle of my body. My feet are apart and provide a solid foundation. What is important in where you pull the strop to is that you are able to have full range of motion for your stropping hand. Too close to your body and it will get in the way on the downward stroke. Too far away and your stretching to reach the leather. Etc.

How Taut Should the Strop Be?

The tautness of the strop is also important, although there is a ton of leeway as continually demonstrated by pictures and videos of barbers using extremely loose strops. Since you are not a barber with decades of experience shaving clients with a straight razor, you should stick with the tried and true. Keep the leather taut, but not too taut. There should be some deflection in the leather, but not so much that the leather is flopping around. Check out the pictures below for an explanation.

The pictures depict the most amount of deflection to the least amount of deflection commonly used. You should strive for the middle picture. The picture is a little skewed, but there isn’t as much deflection as it appears. The bottom is also acceptable and represents a full amount of tension coupled with downward pressure from the razor. As you can see, the downard pressure from the razor adds some deflection to the strop.

I apologize that my assistant wasn’t able to take the photos head on, but I hope you get a better idea of the amount of slack you can/should use.

Flipping the Razor

By far the hardest skill to learn is flipping the razor. This is what all strop and edge damage results from. Incorrect flipping of the razor will result in a nicked strop and possibly a rolled edge. Click on the image below to see how to properly flip your razor.


You flip the razor by rotating on the spine. The edge does all of the moving, the spine stays still. As an additional preventative measure, you should try to flip the razor while the razor is still moving. In other words, slow down the stroke, then while the razor’s edge is still moving very slowly, turn the razor 90° so that the edge is vertical, stop the razor, start moving it in the other direction, then lay the edge flat. Doing this will help prevent nicks and cuts to your strop.

The Laps or Strokes


Stropping is a useless exercise if you don’t do enough laps or don’t do them properly. While it doesn’t matter whether you start stropping at the top of the strop or at the bottom of the strop, it is important to get into the habit of stropping in an X-pattern. Put in words, you start at the top of the strop with the edge facing towards the top, and the toe to the left (assuming you’re right handed). Then as you drag the razor down, or towards you, you pull the razor to the right (or from the heel to the toe). Repeat for the other direction.


You can add some flourishes to the stroke as well. For instance, you can rotate the blade 45° so that the razor is at an angle such as this: / or \. Doing so involves some wrist action. I like to call this type of stroke the “Figure 8.”

Final Thoughts

Stropping is by far the most important straight razor maintenance skill you will learn. If you learn to do it properly, your razor will last for many months. Fail to strop properly and your razor won’t stay sharp for long. To get the most out of your stropping, follow these simple guidelines.

  • Strop often – before & after a shave is ideal.
  • There’s no such thing as too many laps – at least 100 is what I recommend.
  • Utilize a cotton/linen strop – a canvas component is a stropping effect multiplier. Use the cotton before the leather and after the shave to dry the razor.
  • Use an X-Stroke or Figure-8 Stroke – these strokes make sure you strop the entire edge of the razor.
  • Wider is not better – if your using an x-stroke, a 3″ strop does you no good.

How to Use Your Straight Razor Like Sweeney Todd

Do you want to wield your razor with expert hands like Sweeney Todd? If you do, read on. This article is a guided tour of how the pros grip and handle their straight razors. From the most basic of grips to the most advanced of strokes, we cover it all. We will teach you how to get the most out of your straight razor shave.

Make sure you’ve already read our First Straight Razor Shave Guide and our Ultimate Straight Razor Shaving Guide.

How to Hold the Straight Razor

My straight razor shaving guide only covers the most common way to grip a razor. Yet, there are infinitely many different ways you can hold your straight razor. In addition, the against the grain pass requires a different grip altogether. I should note that there is no one right way to hold a straight razor, you can grip it however you want as long as it works for you.

Click To Enlarge Pictures

All grips start similarly to what is pictured above. After opening the razor as pictured, position your hand accordingly. Most people grip the razor thusly, with their index and middle fingers on the blade side and their ring finger on the tail. The pinky finger is left floating, or if the tail is long enough, on the tail. The end result looks like thus:

As you can see, the blade is securely held by the thumb, middle, and index fingers. The ring finger is there for additional control and balance. This grip is meant for downward passes only. If you try to shave in an upward direction you will find that it just doesn’t work like that. Below you will find alternative angles for gripping the razor.


The picture on the left has the pinky finger resting on the tail. For people with either very large razors or large hands, this grip works better. For large razors this grip works because the weight of the razor is more easily controlled by having all three “main” fingers on the blade side, offering more control over the shave. This grip does require a little more dexterity and input from your little finger however. The grip on the right is probably the least commonly used grip. That said, some people do prefer it. Try it if you find the other grips uncomfortable or unwieldy. Only the index, thumb, and middle finger are used in this grip. Personally, I don’t like it, but some people swear by it.

The across the grain (XTG) pass uses the exact same grips. Some people prefer using an ATG grip, but these grips work just as well.

The Against the Grain Grip

The against the grain grip is not quite as formulaic as the downwards grip. Because we have to move the blade in an upwards direction, we must adapt the razor to a position not quite natural. However, once you master straight razor shaving, it is the most natural extension of your hand and razor. Let’s take a look at the most common method.


As you can see, the grip is very similar to the WTG grip, only inverted or upside down. The second picture shows the same grip with the thumb out of the way. Let’s look at a few more ATG grips. You will notice that they are all pretty similar. They all involve the thumb and index finger doing the majority of the controlling.


These grips don’t really need terribly much explaining as the principle is identical. Control the upwards motion of the straight razor using the forefinger and thumb while utilizing the other three fingers to help steady the rest of the razor. Experiment with these grips and find the one that works best for you.

The Strokes

The razor strokes are how you use the razor. The stroke that is always taught is the simple push stroke. The razor is simply pushed forwards in a straight line. While this technique works well, it has its drawbacks. It is not the most effective stroke. As I will show you, the following strokes work much better, but are also more complicated and not as easy to pull off.

Diagonal Push


This stroke is simple. You just move the razor in a diagonal direction. As you can see in the pictures (if you click to enlarge them) is that the razor starts in an upper right position, and is then moved downwards and to the left. This stroke works in all directions: left, right, up, and down. And while it does work backwards, it is infinitely easier and advisable to only lead with the tip. This is a pretty simple stroke, but it is also a dangerous stroke. Many cuts happen when the uninitiated try this stroke on their face. It is a lot harder to master than you might think. While it is simple in principle, in practice it has a tendency to cut if time is not spent to master it properly.

This stroke works because of the slicing action it imposes upon the hairs. The slicing action works because it increases the lateral forces acting upon the hairs and concentrating force at their roots. For a more thorough explanation, check out these links: cutting edge formulas and the physics of cutting. Regardless of why this stroke is more effective, all you need to know is that it works.

Slicing/Scything


This stroke starts off with the razor held horizontally. The razor is then pivoted at the grip point. The benefit of this stroke is that it concentrates the cutting action towards the tip. Read my article on the physics of cutting for the reason why this is optimal. To summarize, by concentrating all the force at the tip, the razor is better able to cut through the hairs. To accomplish the scything stroke, rotate your wrist. Again, this is an advanced stroke. Do it in the air many times before trying it on your face. Move the razor down and repeat as necessary. The same principles apply with the ATG stroke.

A backwards scythe will also work if you pivot at the point and lead with the heel. Although it’s not as easy to pull off, it is helpful for tricky areas where the tip won’t go. This is a very advanced technique and difficult to pull off because your wrist is not made to rotate in that direction.

Final Thoughts

And that’s it. An illustrated guide on how to handle that razor. I hope this article helps you to nail down that ever important grip and find the one that works for you. Remember, there is no right way to shave with a straight razor. There is only the way you shave with it. As long as it works for you, no one can tell you you are wrong. These guides are only a best practices recommendation.

Before trying to master any of the strokes depicted here, I highly recommend mastering the regular push technique first. The advanced strokes really like cutting into your face as well as cutting hairs. So, mastery of the straight razor is key to avoiding unnecessary nicks and cuts. But, once you’ve mastered these strokes, you will have mastered straight razor shaving.

Robert Klass Restoration

This razor came to us with some speckling of light rust. Without intervention, the rust would have spread over time. We removed all the rust, stopping it in its tracks, and then polished the blade to a mirror finish; bringing the blade and scales back to their former glory.

Before


After


Getting Started with Straight Razor Shaving

Shaving doesn’t have to be painful and annoying, it can be one of life’s small pleasures. Once you’ve become proficient with the razor, you can start enjoying the closest and most comfortable shaves of your life. You can also start enjoying the Zen of straight razor shaving. Instead of rushing through the daily ritual and trying to hack away facial hair and skin, you can look forward to shaving and the joy it provides you on a daily basis.

Learning to shave with a straight razor is a huge accomplishment. I’m not going to lie to you and say it is easy. But it’s not terribly difficult either. While some people consider it to be an “art,” this was the exact same shaving method used by our great grandfathers and possibly our grandfathers. If they could do it, we can too.

That said, you shouldn’t go out and dive in head first. Like all good and worthwhile things in life, learning traditional wet shaving takes time and patience to learn it right and avoid mistakes. After all, you didn’t run before you walked, and before you walked, you had to learn to stand. It is the same thing with a straight razor. You cannot just jump right in like a modern cartridge based razor, nor is it as easy as a Double Edge razor. Admittedly this is exactly why straight razor shaving has died out as a normal method of shaving.

Here are some tips to help you get started.

Practice Makes Perfect

I know you’ve been told this over and over again throughout your whole life, but it is true. Without muscle memory, we are basically just stumbling around doing things haphazardly. While a straight razor is much more elegant than a knife, in the larger scheme of things, shaving with a straight razor is one small step away from shaving with a knife. Don’t believe me, check out this video.

So, unless you want to regret ever trying to use a straight razor, I suggest you follow my advice.

Get to Know Your Razor

Feel how it balances in your hand. Try different grips with it. Slice the air, wave it around (safely), or shave your arms and legs. Whatever you do, just get used to how it behaves. 90% of straight razor shaving is controlling the angle. If you can’t control the razor, you won’t get a good shave.

The best way I have found to learn proper angle & holding technique was to shave the back of my hand. Doing that once a day for a few days taught me how the razor worked, what angle was necessary to achieve a cutting action, and most importantly it familiarized me with the razor. Another good technique is to practice the razor strokes in the air. Yet, another technique suggested to barber school students is to shave a balloon or tomato. If you use a balloon, you might want to consider lathering with water only as it could explode.

Now, it is a good idea to shave with both hands. However it is not necessary. I’ll show you how to shave with only one hand in a later tutorial. But if you can master the non-dominant hand, you will find it to be vastly superior, allowing you to shave tough spots much easier.

Each razor has its own balance point. This is affected by things such as blade width, scale material, scale shape, blade shape, hollowness, etc.. Keep trying different grips on the razor to find the one that works best for you. Remember, it is your razor, not mine. You can shave with it however you want. Or, you could use a cleaver like the fellow above. I should note at this point that you will need a separate grip for shaving against the grain. So learn at least two grips for your razor.

Start Off on the Right Foot

Many people start off on the wrong foot. They don’t want to invest the money necessary to start off well, fail to do any preliminary research, or trust the advice of someone who doesn’t actually shave with a straight razor. What happens is that they buy a razor made in Pakistan or some other low quality manufacturer. The second most common mistake is that someone purchases a vintage straight razor without having it properly restored or sharpened.

Don’t skimp on quality. Either buy a professionally honed razor or send your razor out to be professionally sharpened. Look, you wouldn’t shave with a knife would you? Well, if you would, you shouldn’t be wasting your time reading this. For the rest of us, we want a comfortable shave. A shave ready razor is the minimum sharpness level you should be shaving with for maximum comfort. A professional sharpener ensures that shave ready means the razor is honed and tested to ensure it will shave properly. We strop your razor prior to packing it in a light coat of mineral oil and placing it in a plastic bag to ensure 100% sharpness during the shipment back to you.

It’s All About the Angle

Using a cut throat razor is all about the angle. Too high and you end up scraping skin and pulling hairs. Too low, and you won’t cut anything. A truly sharpened razor will be able to shave with a minimum of angle, depending upon the hollowness of the razor and spine wear.

The most recommended starting point is 30°. This angle should not be the starting point, but should be used as a maximum suggested angle. If you’re finding that your razor needs more than 30° to shave properly and is not a wedge, it needs sharpening.

While attaining a 30° angle may seem simple, the truth is that it’s actually quite difficult for many people. The most common mistake is to underestimate the angle you’re using or to gradually increase the angle without knowing it. This is especially true when shaving the chin. Using a higher angle than necessary is what causes irritation, pulling, and scraping.

Below are examples of a few angles, all 30° and under. The angle reference is measured against the legal pad.

A Quick Primer on Stropping

Stropping does two things: realigns the edge and slightly sharpens the razor. I say slightly because the amount of metal removed is measured in microns after a marathon stropping session. A strop is a piece of leather used to “back hone” the razor. Cotton or linen strops are also used and are recommended. A strop is not necessary, but unless you want to be sharpening your razor every other week or once a month, you should invest in one. Click here for some ideas on low cost alternatives.

Quick note: If you’re trying to save money and are not sure you want to stick with a straight razor, I suggest not purchasing a real strop until after you become committed. Use a leather belt instead.

Stropping should consist of 100 back and forth strokes on a leather strop prior to shaving. You can strop the night before, but for optimal results, strop right before you shave. The spine of the razor leads the blade, otherwise you’ll cut into the leather. Flip the razor over by rolling on the spine. To avoid cutting into the strop, start the roll just before you stop the stroke. That way when the razor comes to a stop to go in the other direction, the edge will be off the leather, minimizing the risk of cutting. Also, don’t lift the razor up. That is bad. Click for a more detailed guide on stropping.

Beard Prep is Key

As the title says, beard preparation is the key to a successful attempt at straight razor shaving. Skimping on preparation will only cause unnecessary trouble down the road. That said, if you don’t have the time, you don’t have the time.

Many people shower or wash their face right before they shave. This is a good practice. Not only does the soap and water clear any dirt on your face, but the hot water will seep into the hairs and soften them. Making for an easier cutting medium. Another option some people use is the hot towel method. You know, the same method used by luxury spas or shaving barbers. To replicate the luxury, microwave a damp towel and wrap it around your head. Make sure you don’t microwave it too hot, you don’t want to burn your face.

Some men prefer to go a step further and use a pre-shave oil or cream. Recommended products can be found in our straight razor shaving equipment guide. Still others utilize both a pre-shave oil and do a pre-shave lather. A pre-shave lather is just that, a lather that you don’t shave with. You just let the lather sit and soak for a few minutes prior to wiping it off.

Whatever you choose, what’s truly important is that you stay away from canned goo. Not only does it cost you money and kill the environment, but it doesn’t work as well as traditional shaving soaps. Investing in a quality brush and soap will pay you dividends in the long run. Our favorite soaps can be found here. Not only in better shaves, but in savings as well.

Your First Straight Razor Shaves

Before you begin shaving with a straight razor make sure you will not be distracted. Turn off your phone, lock the door, put the kids to bed, send the wife out to get groceries, etc.. This is extremely important because distractions are what leads to bad cuts. Now, take a breath and heed the following advice.

Shaving with a straight razor is not a competition, not even against yourself. You get no points for finishing faster; in fact if you rush the learning process, you will develop bad habits. If you don’t manage to finish, you are not alone. In fact, I don’t recommend you attempt to shave your entire face or try to achieve a “normal” shave for your first straight razor shave. While some people are skilled enough to do so, there is no reason you have to. There is no stigma attached to finishing with a DE razor. If you don’t finish with a straight, you haven’t failed. In fact, you took your first steps to a better shaving method.

Learning to shave with a straight razor isn’t something that happens overnight. It takes a certain amount of skill and familiarity with the razor to perform properly. Go slowly and train yourself to handle the straight razor properly. Once you have mastered the art, you’ll never look back. You will join the ranks of the few and proud straight razor users. Trust me, the work is worth it.

For your first shave, I recommend you just try to shave your cheeks and only with the grain. If you’re feeling adventurous, try an across the grain pass. But by no means should you try to do an against the grain pass. Doing an against the grain pass is extremely difficult with a straight razor and is where all weepers come from. Don’t worry about getting the offhand side with your offhand. Shaving with your non dominant hand is extremely difficult.

For your second shave, you should try to shave a little more. Don’t worry if all you can accomplish is shaving your cheeks. Your off-hand is likely lagging far behind because of lack of use. Again, not an issue. If you have to shave using only one hand, that is acceptable. There is no right way to use a straight razor. All your trying to accomplish for the first few shaves is two things: 1) just getting comfortable with the razor, how it feels, and how to use it; and 2) whether this is something you want to stick with.

The next area to add is the section from your jaw line to neck. This is a difficult area. Most men’s beards grow downwards, so use a downwards (WTG) stroke. Focus on your dominant hand first. Don’t try to use your non-dominant hand. Meanwhile, continue shaving slowly and working on your non dominant hand and mastering the WTG pass. I’m not going to tell you not to do an ATG or XTG pass as it’s up to you, but if you don’t manage to do these, you are not alone. You are also not alone if your offhand learns extremely slowly. It took me six months for my left hand to catch up with my right hand. Even today I still shave with my right hand where shaving with my left presents no clear advantage.

The next area to tackle is your chin and moustache area. These are the most difficult areas to shave. I recommend not tackling these areas until you are getting good results from the other areas.  The only personalized advice I can give you is that each chin is different. What works for me might not work for you. The best advice I can give you is to go slowly, and use a lot of trial and error. For the moustache, I highly suggest only going for an XTG pass. Some people report that it’s possible to get baby’s butt smooth on your chin with just a couple of WTG pass.

The rest of the learning process is rinse, lather, and repeat. Once you’ve mastered the WTG and XTG passes, you can then move on to against the grain. With practice, dedication, and concentration, you will achieve the perfect shave. Shave on my friends!